Water Systems
All of our systems use only high quality components. For our water systems, we focus on providing customers with reliable and high performing products to make things easy and user friendly.
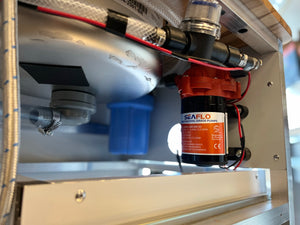
All of our units use quality quick release fittings for convenient filling and optional output features, marine grade pumps that provide 50 PSI water pressure, .5 micron carbon block water filters, and designed to maximize space usage.

Marine grade pump & filtration

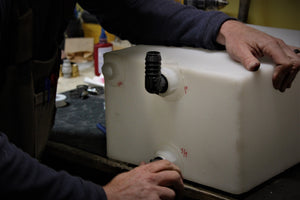
Rigid & bladder style tanks are utilized in our systems

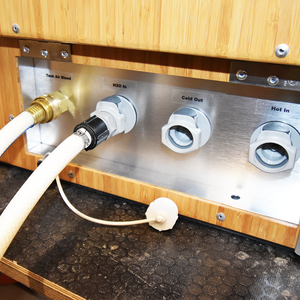
Quick release water fittings that are easy to use & access
Water System Instructions
Fill
Filling your system’s tanks are simple and easy to do.
First locate your utility panel and find your Fill port as well as your Air Bleed port. You’ll want to purchase a dedicated freshwater hose to use for filling your system, and it's also helpful to use a scrap piece of hose for your air bleed requirements.. On one end of your freshwater hose, attach the provided quick release fitting that mates with your Fill port, and on the other you’ll want to leave the garden hose end so you can hook up to your freshwater source. You can do the same for your air bleed, but since this can be a scrap hose, you won’t need a fitting on the other end of this. Both the Fill and Air Bleed ports are valved fittings, these valves wont open until you insert the mating quick release fitting.
To add water to your tank, first insert your Air Bleed fitting into the Air Bleed port on your TK system, and the scrap hose end can just lay anywhere outside your rig. The Air Bleed function allows air to effectively escape your tank or bladder while filling/using. Next you can attach the Fill fitting into the Fill port on your system, and attach the other end to your freshwater source (such as a water spigot). Simply turn on or open your freshwater source and allow water to flow into your TK system. It’s always a good idea to keep an eye out for any leaks while doing this process. When your tank is filled to capacity, water will escape out of the Air Bleed port, this is why having a scrap hose to attach here is nice so water runs clearly outside your rig. At this point you can turn off or close your freshwater source. We like to continue to let some of the built up water to escape out of the Air Bleed after the source has been turned off, this just relieves any unnecessary pressure on your tank. You can now remove both fittings from your TK system and your water tank is now full. ** Each tank in your TK System will have its own Fill and Airbleed function, so this process is repeated for all auxiliary tanks in your rig. **
Use
To use your TK Water System - lets first distinguish what style tanks are in use. We use both Bladder style tanks and Rigid style tanks.
Bladder systems do not require an Air Bleed function while in use, while Rigid tank systems do require an Air Bleed function. These are the same ports we identified for Filling applications. In short - if you have Rigid style tanks in your system, you will need to insert your Air Bleed fitting into the Air Bleed port.
You can now turn on the Pump Switch located on your system. This will turn on the pump inside your unit, and begin to prime your system. Priming time may vary based on the distance between your tank and pump, but usually only takes a few seconds. Once your pump is primed it will automatically standby until a faucet our output function is opened. Simply open your faucet and water will begin to flow steadily and with good pressure. When a faucet or output is closed, the pump will again automatically enter into standby. When you are done using your water system, you can turn off your Pump Switch to shut the pump off completely.
When traveling, it's best to remove all fittings from your Air Bleed ports to prevent sloshing.
Multiple Tanks
If you have a multi-tank set up in your rig, it's important to understand how to efficiently operate your system. Most multi-tank set ups involve one of our Galley Units, combined with a Wheel Well Cabinet to maximize water storage. In this application, the pump and filtration unit are located inside the Galley unit, with additional water storage and features in the wheel well cabinet. Such setups might include a hot water heater and water outputs off the rear of the van for showers. When using multiple water tanks for one pump, we isolate the water tanks with accessible or electric ball valves in order to efficiently pull from one tank at a time. Usually there is water storage inside of your galley, and water storage in your wheel well cabinet with a ball valve or valves to isolate them from each other. In settings when a ball valve is easily accessible, a manual turn ball valve will be in place. In other settings we use a series of electric ball valves with switches to either open or close a tank. Using these ball valves allows your pump to pull water more efficiently and consistently.
When Galleys and Wheel Well Cabinets are ordered together, units are pre plumbed for easy hook up and installation. If your system has a Hot Water heater, there will be a supply line for water to the heater and back to your faucet and other optional hot water output ports.
Hot Water Heaters
Our Systems can utilize both On Demand Propane Hot Water Heaters, as well as Electric Hot Water Heaters. Both options are great for providing hot water to your Galley or for shower set ups for your rig. These hot water heaters are mounted into a wheel well cabinet, and come standard with rear utility access for use off the rear of your rig.
Gray Water
Some vans are equipped with 5-20 gallons of gray water storage capacity. In both cases, the storage tanks are equipped with an electric drain valve for easy evacuation of gray water.
Winterization
In the case of needing winterization, all water must be evacuated from the system to ensure that no damage occurs from frozen water. Best practice is to run tanks dry with the onboard pump, until no water is coming from the faucet.
Next, remove and empty the filter cartridge of any water.
Proceed to empty any gray tanks as normal.
Finally, using your quick release fittings - insert the fitting into all ports to drain residual water from fittings on cabinets.
If your van is equipped with an on demand propane water heater, there is a small drain plug at the bottom of the unit that will need to be removed for water drainage.

